
Hello, Deliciousness!
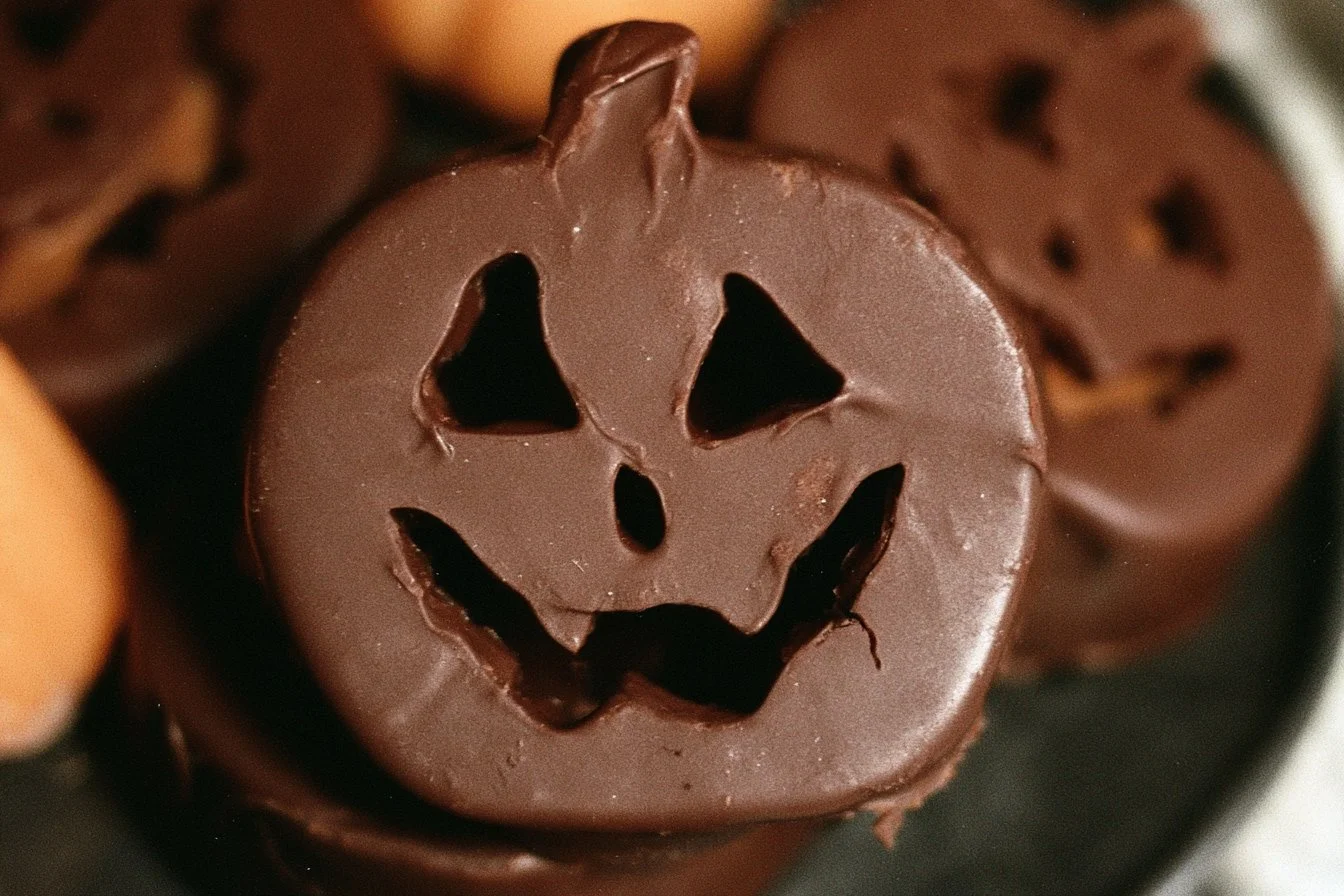
Chocolate Peanut Butter Pumpkins are more than just a Halloween treat; they’re a delightful balance of creamy peanut butter and rich dark chocolate that’s both fun to make and even more fun to eat! I stumbled upon this recipe in search of a festive, kid-friendly dessert to whip up for a Halloween gathering, and boy, did it not disappoint! With their cute pumpkin shape and irresistible flavor, these treats have quickly become a seasonal favorite in my kitchen.
Why you’ll love this dish
Why should you dive into making Chocolate Peanut Butter Pumpkins? Apart from their adorable appearance, this recipe is incredibly quick and straightforward, making it perfect for that busy weeknight when you want to whip up something special without spending hours in the kitchen. It’s kid-approved, so you can get the little ones involved in the fun—there’s plenty of mixing, melting, and, of course, taste-testing! Furthermore, these treats are budget-friendly and can be tailored to suit various dietary needs. Whether you’re prepping for a Halloween party or just indulging in some sweet nostalgia, these little pumpkins won’t let you down!
Preparing Chocolate Peanut Butter Pumpkins
Ready to create some Halloween magic? The process is a simple yet satisfying affair that involves a few steps to get your chocolate peanut butter creations from concept to confection. You’ll melt, mix, fill, and chill—each step building upon the last to bring this charming treat to life.
What you’ll need
Here’s your essential ingredient list, easy to gather and perfect for creating these pumpkiny delights:
- 1 cup dark chocolate chips
- 1 cup peanut butter
- 1/2 cup powdered sugar
- 1/4 cup finely crushed graham crackers
- Pumpkin-shaped silicone molds
- Sea salt (optional for that extra flair)
Feel free to experiment with variations like milk chocolate or nut butter for a unique twist!
Step-by-step instructions
Let’s break down the steps for making your Chocolate Peanut Butter Pumpkins:
-
Melt the chocolate: Start by melting the dark chocolate chips. You can use a microwave or a double boiler—just ensure it’s smooth and creamy.
-
Coat the molds: With a spoon, carefully coat the inside of your pumpkin-shaped molds with the melted chocolate, ensuring an even layer.
-
Chill to set: Place the molds in the refrigerator for about 10 minutes so the chocolate hardens nicely.
-
Mix the filling: In a bowl, combine the peanut butter, powdered sugar, and crushed graham crackers until everything is well blended.
-
Fill the shells: Once set, remove the molds from the fridge and fill each chocolate shell with your peanut butter mixture.
-
Seal it up: Cover the peanut butter filling with another layer of melted chocolate to seal those delicious fillings in.
-
Final chill: Return the molds to the refrigerator for another 10-15 minutes to set completely.
-
Pop them out: Once firm, carefully remove your chocolate pumpkins from the molds.
-
Add seasoning (if desired): If you like, sprinkle a bit of sea salt on top for a delightful contrast.
-
Enjoy! These scarily good Halloween treats are ready to be devoured!
Best ways to enjoy it
Wondering how to serve these charming pumpkins? They’re perfect as a standalone treat but can also be presented on a festive platter alongside other Halloween goodies. For a family-friendly gathering, consider pairing them with apple cider or a scoop of vanilla ice cream. You could even make them a part of a Halloween dessert table for maximum spookiness!
Keeping leftovers fresh
To keep your Chocolate Peanut Butter Pumpkins fresh, store any leftovers in an airtight container in the refrigerator. They can stay delicious for up to a week. If you’re looking to make them ahead of time, you can also freeze them. Just make sure to layer them with parchment paper to prevent sticking, and they will be good for up to 3 months!
Tips to make
Here are a few pro tips for achieving pumpkin perfection:
- Melt chocolate slowly: If you’re using a microwave, melt the chocolate in short bursts to avoid burning.
- Use parchment paper: When chilling the molds, placing a sheet of parchment paper beneath will make for easy cleanup!
- Measure carefully: Pay attention to the measurements—too much peanut butter may make the filling too gooey to fill nicely.
Creative twists
Looking to switch things up? You can experiment with different toppings or fillings. Try adding crushed Halloween candy bars into the mix or use white chocolate for a ghostly version of your pumpkins. For those with dietary restrictions, nut-free chocolate or alternative sweeteners can easily replace the original ingredients while still providing that flavorful punch.
Your questions answered
Can I make these in advance?
Absolutely! You can prepare them a few days ahead of your Halloween party.
What chocolate can I use besides dark chocolate?
Feel free to experiment with milk chocolate or even white chocolate for a different taste!
How should I store the leftovers?
Keep your Chocolate Peanut Butter Pumpkins in an airtight container in the refrigerator for up to a week. If you want to store them long-term, freezing is a great option.
Print
Chocolate Peanut Butter Pumpkins
- Total Time: 30 minutes
- Yield: 12 servings 1x
- Diet: Vegetarian
Description
Delightful chocolate and peanut butter treats shaped like pumpkins, perfect for Halloween.
Ingredients
- 1 cup dark chocolate chips
- 1 cup peanut butter
- 1/2 cup powdered sugar
- 1/4 cup finely crushed graham crackers
- Pumpkin-shaped silicone molds
- Sea salt (optional)
Instructions
- Melt the chocolate: Start by melting the dark chocolate chips using a microwave or a double boiler until smooth.
- Coat the molds: Carefully coat the inside of your pumpkin-shaped molds with the melted chocolate.
- Chill to set: Place the molds in the refrigerator for about 10 minutes.
- Mix the filling: Combine the peanut butter, powdered sugar, and crushed graham crackers in a bowl.
- Fill the shells: Remove the molds from the fridge and fill each chocolate shell with the peanut butter mixture.
- Seal it up: Cover the filling with another layer of melted chocolate.
- Final chill: Return the molds to the refrigerator for another 10-15 minutes.
- Pop them out: Carefully remove the chocolate pumpkins from the molds.
- Add seasoning: Sprinkle sea salt on top if desired.
- Enjoy! These scarily good Halloween treats are ready to be devoured!
Notes
Store leftovers in an airtight container in the refrigerator for up to a week, or freeze for longer storage.
- Prep Time: 15 minutes
- Cook Time: 15 minutes
- Category: Dessert
- Method: Chilling
- Cuisine: American
Nutrition
- Serving Size: 1 pumpkin
- Calories: 180
- Sugar: 12g
- Sodium: 60mg
- Fat: 11g
- Saturated Fat: 4g
- Unsaturated Fat: 5g
- Trans Fat: 0g
- Carbohydrates: 19g
- Fiber: 1g
- Protein: 4g
- Cholesterol: 0mg