
A Delicious Twist on a Classic Dessert
Tiramisu Ice Cream Layer Cake is a heavenly creation that brings together the beloved flavors of tiramisu and ice cream in an irresistible layered dessert. I’ve made this showstopper for family gatherings and summer parties, and it never fails to impress. With its delightful blend of coffee and creamy textures, this cake is perfect for any occasion, from a casual weeknight treat to a sophisticated dinner party. Every bite feels like a luxurious experience, making it a standout dessert that will leave your guests asking for seconds.
Why You’ll Love This Dish
Making Tiramisu Ice Cream Layer Cake at home has its benefits. First, it’s surprisingly simple to whip up, requiring minimal equipment and fuss. This means even novice bakers can impress with a gourmet dessert that looks as amazing as it tastes. Plus, it’s budget-friendly—using store-bought ice cream cuts down on lengthy prep time while still delivering that authentic tiramisu flavor.
This cake is particularly great for warm summer days when you crave something cold and refreshing. It’s also a fantastic make-ahead option; simply prepare it in advance and let it freeze. As a bonus, there’s no baking involved, allowing you to skip that hot kitchen hassle. Whether you’re hosting a birthday party, a holiday get-together, or just celebrating life, this dessert is sure to deliver smiles all around.
How This Recipe Comes Together
Creating this layered cake is both fun and straightforward. You’ll assemble layers of creamy ice creams and coffee-soaked sponge fingers to build your dessert masterpiece. Here’s a brief overview of the process:
- Line a loaf tin with plastic wrap.
- Layer softened vanilla ice cream, followed by soaked sponge fingers dipped in a luscious coffee mix.
- Top with coffee ice cream, followed by more vanilla and finally a cocoa dusting.
- Freeze until firm, and slice when you’re ready to serve.
Let’s dive into the ingredients so you can start gathering what you’ll need!
Key Ingredients You’ll Need
For this decadent Tiramisu Ice Cream Layer Cake, gather the following:
- 500ml store-bought vanilla ice-cream (softened for better spreadability)
- ¼ cup (60ml) coffee-flavoured liqueur
- ¼ cup (60ml) strong espresso coffee (cooled to avoid melting the ice cream)
- 12 sponge finger biscuits (also known as ladyfingers)
- 500ml store-bought coffee ice-cream (softened)
- Dutch cocoa (for dusting, optional but highly recommended)
Feel free to swap out the vanilla or coffee ice cream for other flavors to create a personalized touch!
Step-by-Step Instructions
- Line a 10cm x 21cm loaf tin with plastic wrap. This will help you easily remove the cake later.
- Spread half of the softened vanilla ice-cream across the bottom of the lined tin.
- In a bowl, mix the coffee-flavoured liqueur with the cooled espresso coffee.
- Briefly soak the sponge finger biscuits in the coffee mixture to infuse them with flavor.
- Layer the soaked sponge biscuits over the vanilla ice cream.
- Spread the coffee ice-cream evenly over the biscuits.
- Add another layer of the remaining vanilla ice-cream on top.
- Finish with a final layer of soaked biscuits, pressing them down lightly to compact the layers.
- Dust the top with Dutch cocoa powder for that authentic tiramisu finish.
- Cover with plastic wrap and freeze the cake for at least 4 hours, or until firm.
- When ready to serve, gently remove the cake from the tin, slice, and enjoy!
Best Ways to Enjoy It
This Tiramisu Ice Cream Layer Cake is a showstopper on its own, but you might want to elevate the experience. Serve it with a drizzle of chocolate or caramel sauce for added flair. Freshly whipped cream can add a luscious touch on top, and don’t forget a sprinkle of cocoa or chocolate shavings for presentation. Pair it with a hot cup of espresso or a sweet dessert wine to complement the cake’s rich flavors for an elegant dessert experience.
Keeping Leftovers Fresh
Storing your Tiramisu Ice Cream Layer Cake is simple. Ensure it’s well-wrapped in plastic wrap or kept in an airtight container to prevent freezer burn. It can last in the freezer for about one month. If it has been sitting for a while and you’re unsure about its quality, check for any unpleasant odors or separation; if anything seems off, better safe than sorry!
Helpful Cooking Tips
Here are some pro tips to ensure your cake turns out perfectly:
- Make sure your ice cream is fully softened but not melted for easy spreading.
- Don’t soak the sponge fingers for too long; a quick dip is sufficient to avoid mushiness.
- For a fun twist, experiment with flavored liqueurs like amaretto or hazelnut for a unique spin on the traditional tiramisu.
Creative Twists on the Classic
Feeling adventurous? Here are a few variations to inspire you:
- Swap the coffee ice cream for chocolate ice cream for a rich chocolate tiramisu.
- Use flavored syrup instead of liqueur for a non-alcoholic option.
- Incorporate layers of fresh fruit, like raspberries or strawberries, for an extra burst of flavor.
Your Questions Answered
How long does it take to prepare this cake?
Total preparation time is about 20–30 minutes, but remember to allow at least 4 hours for freezing.
Can I use homemade ice cream instead of store-bought?
Absolutely! If you have a favorite homemade ice cream recipe, feel free to use it. Just ensure it’s a soft consistency when layering.
Is there a low-carb option for the sponge fingers?
Yes, for a low-carb version, you could use a recipe for low-carb cake or biscuits that match the texture of ladyfingers.
This Tiramisu Ice Cream Layer Cake will become a favorite in no time! Enjoy each delicious slice.
Print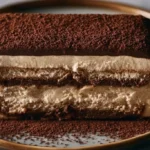
Tiramisu Ice Cream Layer Cake
- Total Time: 240 minutes
- Yield: 8 servings 1x
- Diet: Vegetarian
Description
A creamy, layered dessert combining the rich flavors of tiramisu and ice cream, perfect for any occasion.
Ingredients
- 500ml store-bought vanilla ice cream (softened)
- ¼ cup (60ml) coffee-flavoured liqueur
- ¼ cup (60ml) strong espresso coffee (cooled)
- 12 sponge finger biscuits (ladyfingers)
- 500ml store-bought coffee ice cream (softened)
- Dutch cocoa (for dusting, optional)
Instructions
- Line a 10cm x 21cm loaf tin with plastic wrap.
- Spread half of the softened vanilla ice cream across the bottom of the lined tin.
- Mix the coffee-flavoured liqueur with the cooled espresso coffee.
- Soak the sponge finger biscuits briefly in the coffee mixture.
- Layer the soaked biscuits over the vanilla ice cream.
- Spread the coffee ice cream evenly over the biscuits.
- Add another layer of remaining vanilla ice cream on top.
- Finish with a final layer of soaked biscuits, pressing them down lightly.
- Dust the top with Dutch cocoa powder.
- Cover with plastic wrap and freeze for at least 240 minutes or until firm.
- Remove from the tin, slice, and enjoy!
Notes
Serve with chocolate or caramel sauce, and pair with espresso for a delightful experience.
- Prep Time: 30 minutes
- Cook Time: 0 minutes
- Category: Dessert
- Method: No Bake
- Cuisine: Italian
Nutrition
- Serving Size: 1 serving
- Calories: 400
- Sugar: 35g
- Sodium: 150mg
- Fat: 20g
- Saturated Fat: 10g
- Unsaturated Fat: 8g
- Trans Fat: 0g
- Carbohydrates: 45g
- Fiber: 1g
- Protein: 5g
- Cholesterol: 45mg