
Nothing beats the joy of a Frozen Brownie Ice Cream Cake! This dessert is a glorious combination of rich chocolate brownies layered with creamy ice creams, all topped with fluffy whipped cream and a drizzle of chocolate sauce. Perfect for birthdays, holiday gatherings, or even just because you deserve a treat, this cake is both simple to make and incredibly satisfying. Imagine bringing this showstopper to your next family get-together and watching everyone’s eyes light up with excitement!
Why this dessert should be on your radar
This delightful cake is not only a crowd-pleaser but also an easy way to elevate your dessert game without spending hours in the kitchen. Here are a few compelling reasons to whip up this recipe at home:
- Quick and Easy: With just a box of brownie mix and a few other ingredients, you can create a stunning dessert that feels gourmet but requires minimal effort.
- Kid-Friendly: This is a fun recipe to make with kids. They’ll enjoy pouring in the ingredients and layering the ice cream, making it a memorable family activity.
- Versatile for Any Occasion: Whether it’s a hot summer day or a chilly winter evening, this cake is always a hit. Its cool, creamy texture makes it perfect year-round.
The process of creating Frozen Brownie Ice Cream Cake
Making this memorable dessert involves a few straightforward steps, which I’ll guide you through. You’ll need to bake the brownies, mold the ice cream layers, and assemble everything. Here’s what you can expect:
- Bake brownies according to package instructions and let them cool.
- Layer your favorite ice creams in a springform pan, freeze between layers, and finally add whipped cream before serving. Easy as pie—or in this case, cake!
What you’ll need
Before diving into the recipe, gather these key ingredients:
- 1 box brownie mix
- 2 cups vanilla ice cream
- 2 cups chocolate ice cream
- 1 cup whipped cream
- Chocolate sauce (for drizzling)
- Chocolate shavings (for garnish)
Feel free to swap flavors! For instance, if you’re not a fan of vanilla, how about a swirl of strawberry ice cream for a fruity twist?
Step-by-step instructions to prepare your cake
Let’s break down the cooking process into simple, manageable steps:
- Preheat your oven and prepare the brownie mix according to the package directions, pouring it into a 9×13 inch pan. Bake and allow to cool completely.
- Once your brownies are cool, slice them in half, creating two layers. Place one layer in a springform pan.
- Spread a thick layer of vanilla ice cream over the first brownie layer and freeze for about 30 minutes until set.
- Add a layer of chocolate ice cream on top of the vanilla and freeze again for another 30 minutes.
- Place the second layer of brownies on top of the chocolate ice cream and freeze for about two hours to firm up.
- When ready to serve, carefully remove the cake from the springform pan and spread fluffy whipped cream over the top.
- Drizzle with chocolate sauce and sprinkle chocolate shavings for that extra touch before serving.
Creative ways to enjoy this dessert
To elevate your presentation, consider the following tips:
- Plating: Slice the cake into wedges and place each slice on an elegant dessert plate.
- Pairing: Serve it with fresh berries, a scoop of your favorite ice cream, or even a side of caramel sauce for an added flavor boost.
- Garnish: Offer toppings like crushed nuts or colorful sprinkles on the side to invite guests to customize their dessert.
Keeping your cake fresh after the party
If you have any leftovers (though that’s unlikely), here’s how to store them properly:
- Freezing: Keep the layers intact by wrapping the cake tightly in plastic wrap and then aluminum foil. This will help prevent freezer burn.
- Reheating: When you’re ready to enjoy it again, thaw the cake in the refrigerator for a few hours before serving. Avoid using the microwave, as that could affect the ice cream texture.
Pro tips for perfect results
- Make it ahead: This dessert can be prepared a day in advance, making it a great option for party planning. Just keep it in the freezer until it’s time to serve.
- Brownie quality: Using high-quality brownie mix or even homemade brownies can take this cake to the next level.
- Ice Cream Consistency: Allow your ice creams to sit out for a few minutes before spreading them; this makes it easier to layer.
Fun variations to explore
Got creative juices flowing? Here are a few variations to kick things up a notch:
- Flavor Swaps: Try switching up the ice cream flavors—think mint chocolate chip or cookies and cream for a new spin.
- Nutty Crunch: Add layers of crushed nuts between the ice cream layers for extra texture.
- Healthier Alternatives: Use low-sugar or dairy-free ice cream to create a lighter version of this decadent dessert.
Common questions answered
How long does it take to prepare this cake?
Expect about 30 minutes of prep time, plus several hours of freezing. It’s perfect if you prepare it a day ahead.
Can I use homemade brownies instead of a mix?
Absolutely! Homemade brownies enhance the flavor and allow you to customize the texture to your liking.
How long can I keep the cake in the freezer?
The cake is best enjoyed within a week when stored properly, but it can last up to three weeks if wrapped tightly.
This Frozen Brownie Ice Cream Cake is not just a dessert; it’s an experience that brings family and friends together while satisfying your sweet tooth. Enjoy making—and eating—this easy, delicious treat!
Print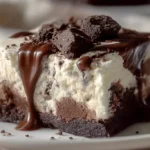
Frozen Brownie Ice Cream Cake
- Total Time: 180 minutes
- Yield: 12 servings 1x
- Diet: Vegetarian
Description
A delightful dessert combining rich chocolate brownies with creamy ice creams, topped with whipped cream and chocolate sauce.
Ingredients
- 1 box brownie mix
- 2 cups vanilla ice cream
- 2 cups chocolate ice cream
- 1 cup whipped cream
- Chocolate sauce (for drizzling)
- Chocolate shavings (for garnish)
Instructions
- Preheat your oven and prepare the brownie mix according to the package directions, pouring it into a 9×13 inch pan. Bake and allow to cool completely.
- Slice the cooled brownies in half, creating two layers. Place one layer in a springform pan.
- Spread a thick layer of vanilla ice cream over the first brownie layer and freeze for about 30 minutes until set.
- Add a layer of chocolate ice cream on top of the vanilla and freeze again for another 30 minutes.
- Place the second layer of brownies on top of the chocolate ice cream and freeze for about two hours to firm up.
- Carefully remove the cake from the springform pan and spread whipped cream over the top.
- Drizzle with chocolate sauce and sprinkle chocolate shavings before serving.
Notes
Make this cake a day in advance and freeze to enhance flavor and convenience. Customize ice cream flavors and toppings to suit your taste.
- Prep Time: 30 minutes
- Cook Time: 30 minutes
- Category: Dessert
- Method: Freezing
- Cuisine: American
Nutrition
- Serving Size: 1 slice
- Calories: 350
- Sugar: 20g
- Sodium: 200mg
- Fat: 15g
- Saturated Fat: 8g
- Unsaturated Fat: 5g
- Trans Fat: 0g
- Carbohydrates: 45g
- Fiber: 2g
- Protein: 5g
- Cholesterol: 25mg